1. Login Application
This tutorial provides some simple steps for creating a website login application that can be used later in any big Struts Hibernate and Spring based application. The application consists of three important areas as registration, log in and update profile. These later enable users to start login into a website.
Register: The registration page has five fields namely User Id, Password, E-mail, Address and Phone number. To register you in the company website user has to enter the required details in the registration form.
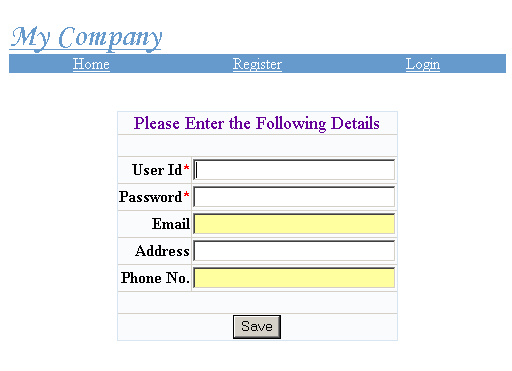
Following Entries are accepted on the Registration Form
- User Id - User can enter desired User Id in the text box
- Password – User can enter suitable password in the text box.
- E-mail Address – User enters a valid e-mail Id in the field.
- Address and phone numbers – These fields are used to take the user address and phone numbers in the respective fields.
2. Designing Database
Database designing is considered as crucial stage in the development lifecycle of the web application. The database is finally responsible for storing the data in the database for retrieval in future. So, the database design should be done in such a way that it full fill all your business requirements.
In this application we are only concern with take the new user information and saving in the database for authenticating the user in the future.
We are using MySQL database for this application. MySQL one of the open source, free and widely used relational database for applications.
Creating the database:
I am assuming that you have already installed MySQL on your machine and have access to the database server. Login to your MySQL Server and create a database "strutshibernatespring".
Creating tables:
Then connect to the database "strutshibernatespring" and create table "login". Here is the script to create login table:
CREATE TABLE `login` (
`id` int(11) NOT NULL default '0',
`loginid` varchar(20) NOT NULL default '',
`password` varchar(20) NOT NULL default '',
`email` varchar(30) default NULL,
`address` varchar(60) default NULL,
`phno` int(11) default '0',
PRIMARY KEY (`id`),
UNIQUE KEY `loginid` (`loginid`)
) TYPE=MyISAM;
3. Integrate Struts, Hibernate and Spring
n this section you will learn how to download required software for our Login and Registration Application. In this tutorial we are using one of the best technologies (Struts, Hibernate and Spring). This tutorial is very good if you want to learn the process of integrating these technologies in your application and developed highly scalable and robust web application.
Download Struts:
The latest version of Struts can be downloaded from
http://struts.apache.org/download.cgi. We are using Struts version
Download Hibernate:
The latest version of Hibernate can be downloaded from
http://www.hibernate.org/6.html. We are using hibernate-3.1.3 for this tutorial.
Download Spring:
The latest version of Spring Framework can be downloaded from
http://www.springframework.org/download. We are using spring-framework-1.2.8-with-dependencies for this tutorial.
Setting up Development Directory:
Development directory is very important for any project. It helps you organize all the software components to make the development process easy. In the web development process you make changes to the program and then compile, package and deploy on the application on the application server. Once the application is deployed you test the effect of your changes. This is repetitive task in the programming, so its is very important to have good directory structure that helps you reduce the time taken in compilation and deployment process. In our application we are using tomcat server. Here are the process to integrate all the components and then compile and test your development directory structure. If you don't want to waste the time in setting up the directory structure you can download the full application from our website. To download the code click here.
- Extract "struts-blank.war" into copy the directory "struts-blank" to "integrated\src" and rename the directory struts-blank to project.
- Copy all the files from "spring-framework-1.2.8-with-dependencies\spring-framework-1.2.8\dist" into "\integrated\src\project\WEB-INF\lib".
- Copy hibernate3.jar from hibernate-3.1.3\hibernate-3.1 into \integrated\src\project\WEB-INF\lib.
- Copy all the files from "hibernate-3.1.3\hibernate-3.1\lib" into "integrated\src\project\WEB-INF\lib".
- Download "applicationContext-hibernate.xml" and "jdbc.properties" files and then place in the
"integrated\src\project\WEB-INF\" folder.
- Modify the "jdbc.properties" and change the following parameters for your database:
jdbc.driverClassName=com.mysql.jdbc.Driver
jdbc.url=jdbc:mysql://192.168.10.3:3306/strutshibernatespring
jdbc.username=deepak
jdbc.password=deepak
- Create an directory "libext" under "project\WEB-INF\". This directory will be used in our project to place the library files that which will used to compile the java classes. For compiling Servlets we need the Servlet, so you find "servlet-api.jar" from you tomcat server and copy in "libext" directory.
- Download "build.xml" file and replace the "build.xml" file present in "project\WEB-INF\src" directory.
- In the build.xml file you can change the jar file name for your application by changing the following value:
<property name="project.jar.file" value="project.jar"/>
When you run ant compile from command prompt, all the java files will be compiled and a jar file is created and placed in the lib directory.
- Now copy the project directory to webapps directory of your tomcat server.
- Start the tomcat and type http://localhost:8080/project in browser. Your browser should show the default welcome page that comes with struts-blank application.
In the tutorial we are developing web application that will enable the new users to register online. Existing users can logon to the system. System authenticates the user against the database and if the credentials provided by user are correct then user is allowed to login to the system, otherwise appropriate message is displayed.
Hibernate Mapping Class
We have only one table into the database and we need one POJO class and the hibernate mapping file to map the login object to the database table. Here is the code for "Login.hbm.xml" mapping file:
<?xml version="1.0" encoding="UTF-8"?>
<!DOCTYPE hibernate-mapping PUBLIC "-//Hibernate/Hibernate Mapping DTD//EN"
"http://hibernate.sourceforge.net/hibernate-mapping-3.0.dtd">
<hibernate-mapping auto-import="true" default-lazy="false">
<class name="roseindia.dao.hibernate.Login" table="login" >
<id name="id"
type="java.lang.Integer"
column="id"
>
<generator class="increment" />
</id>
<property
name="loginid"
type="java.lang.String"
column="loginid"
not-null="true"
unique="true"
length="20"
/>
<property
name="password"
type="java.lang.String"
column="password"
not-null="true"
length="20"
/>
<property
name="email"
type="java.lang.String"
column="email"
not-null="false"
length="30"
/>
<property
name="address"
type="java.lang.String"
column="address"
not-null="false"
length="60"
/>
<property
name="phno"
type="int"
column="phno"
not-null="false"
length="11"
/>
</class>
</hibernate-mapping>
Above file should be present in the project\WEB-INF\src\java\roseindia\dao\hibernate directory.
POJO Class
Here is the code of Login.java POJO class:
        package roseindia.dao.hibernate;


import java.io.Serializable;


public class Login implements Serializable {


    /** identifier field */

    private Integer id;


    /** persistent field */

    private String loginid;


    /** persistent field */

    private String password;


    /** persistent field */

    private String email;


    /** persistent field */

    private String address;


    /** persistent field */

    private int phno;


    /** full constructor */

    public Login(Integer id, String loginid,
String password, String email, String address, int phno) {
this.id = id;
this.loginid = loginid;
this.password = password;
this.address = address;
this.phno = phno;
this.email = email;
}
/** default constructor */
public Login() {
}
public Integer getId() {
return this.id;
}
public void setId(Integer id) {
this.id = id;
}
public String getLoginid() {
return this.loginid;
}
public void setLoginid(String loginid) {
this.loginid = loginid;
}
public String getPassword() {
return this.password;
}
public void setPassword(String password) {
this.password = password;
}
public String getAddress() {
return address;
}
public void setAddress(String address) {
this.address = address;
}
public String getEmail() {
return email;
}
public void setEmail(String email) {
this.email = email;
}
public int getPhno() {
return phno;
}
public void setPhno(int phno) {
this.phno = phno;
}
}Save the above code into project\WEB-INF\src\java\roseindia\dao\hibernate directory.
In this section we developed the POJO class and the mapping file for our project.
Không có nhận xét nào:
Đăng nhận xét